My foam brush is just water! Where is the…. Foam brush stuff! :)

Just a side note to start: This might seem obvious but…. When you make any change the dilution tank will need to be drained before you will know if you fixed the problem. Yes you will be able to see chemical being pulled into the dilution tank when you fix the problem…. So you could wait. 🙂  I was just addressing the fix will not be instant for the foam brush.  The dilution tank is filled with water and needs the correct dilution of chemical for the foam brush to work correctly again..

foam.jpg

When you are troubleshooting a foam brush problem it can be lots of problems.  This time the issue was “none of the foam brushes are working”.

  1.  So the first thing to do is verify if it is really all the bays are not working.  Always verify.


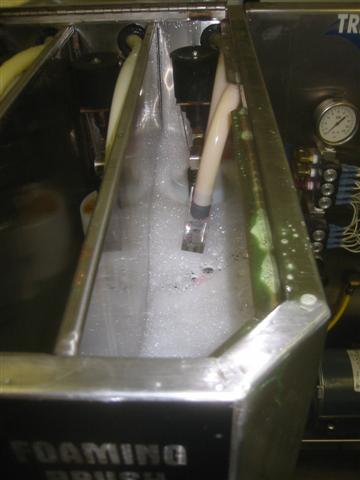
Next check your dilution tank or holding tank…. Just check your tank with your hydrominder in it.  You are checking to see:

  1. Is your hydrominder stuck?
  2. Is the chemical hose connected?

If the hose and hydrominder seem to be working properly it is probably the next item.

IMG_0478.JPG
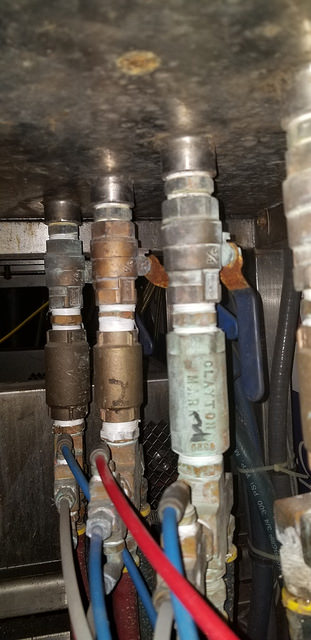
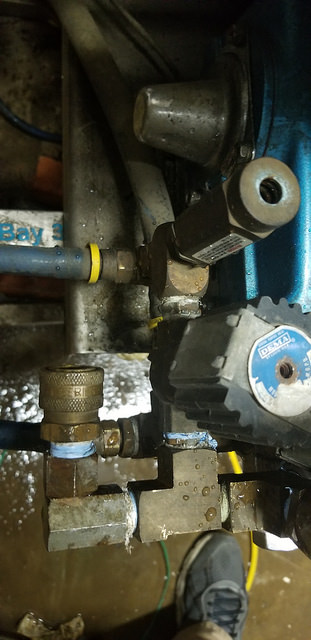
I have had every problem ever with foot valves.  Yes you need them and yes they go bad especially in harsh chemicals.  (The gray foot valves are for harsher chemicals.)  There is also a reason I use pvc.  (Maybe 2 feet?)  This makes the new hose straight and when the hose hardens over time it will be easier to pull out of the chemical drum.

    1. Check your chemical…. Do you have any?  🙂
    2. Check to make sure your hose and foot valves are under the chemical line.  This allows the hydrominder to suck the chemical needed for the foam brush.
    3. You can check the foot valve…. maybe clean it?  But I would replace the foot valve if that is the problem.

IMG_6642.JPG
I am not sure…. but hydrominder troubleshooting may need its own how to? LOL 🙂 I was trying to make this simple for someone. 🙂

But hydrominders are also not complex either….  you can also just replace a lot of the parts which are sold separably.

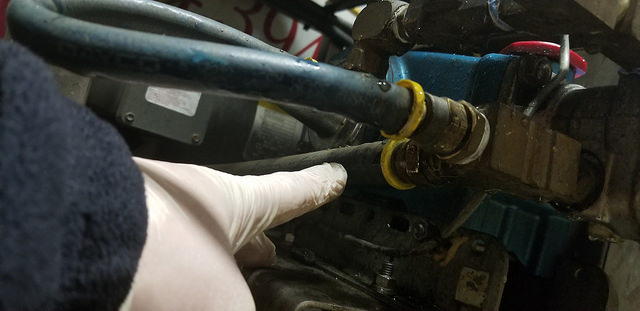
  1. Check hose seal on hydrominder…. Some times the hose can get to fat or crack…. basically pull air which is bad.
  2. Check the hydrominder water pressure…. If the water is barely coming out you might have some sort of build up in the hydrominder.
  3. Check the hydrominder for cracks…. Usually you will know there is a problem like the picture above.  🙂
  4. Check the post alignment…. Sometimes the post (or whatever it is called) is off and causes it is randomly stick.

So my chemical drum tips:

  • Never put the draw hose all the way at the bottom of the drum.  If something goes wrong all your chemical could get sucked out!
  • Use around 2 feet of pvc to keep the hose straight and everything cleaner…. maybe.  🙂

My hydrominder tips:

  • Use stainless screws…. Are these really not included?  🙂
  • Keep some parts on hand…. I had a couple full spares and way to many individual parts.  If this breaks you are in trouble.  🙂

My high pressure car wash bay setup

IMG_2922.JPGIMG_2941.JPGIMG_1959.JPG
(For this original picture I had a Mosmatic 90 degree swivels…. I did not post my results yet.  But from my unscientific research conclusion.  I believe Mosmatic fittings are the nicest looking fittings, the most expensive fittings and do not last as long or as well as any of my other fittings I have used previously.  I would recommend Parker, Value Line, Kleen-Rite brand…. I believe you understand my unscientific conclusion here.  🙂  But the Mosmatic fitting did last around 9 years and they can be rebuilt…. Just like all the others which I would not rebuild.  Mosmatic fittings just cost a lot more and they do not last 15-30 years.  LOL 🙂  I do like shiny things though!  I also purchased a Mosmatic 40.032 $33.07.)

If you noticed from the picture…. I also used a Mosmatic 3/8 30.154 inline swivel fpt $34.67.  I used it between the whip hose and the bay hose.  I believe an inline swivel works better on the gun.  I also tried 2 swivel…. Up top and on the gun…. I just use one at the gun.  Also the performance from this Mosmatic swivel must not have been that exciting I do not remember?  Maybe it is brass looking now and it is still installed?  🙂

Basic information:

  • All fittings are 3/8 for high pressure in the bay
  • NPT: National pipe thread taper / US standard or Normal pipe thread!  🙂
  • MPT: Male pipe thread
  • FPT: Female pipe thread
  • I have in the past couple years tried to purchase my fittings from amazon.com.  Most of the time you can find them HERE or by searching.  But sometimes the cost is a little high LINK ($8.99 on 4/17/2018).  But if you consider what you need…. Shipping from KR is not free and I have found I can waist an hour or more getting one ebow sometimes.  (Different stores.)  But Home Depot now pulls stock for you but the prices are retail…. But you can get them the same day.
  • I have noticed amazon.com and Northern Tools have more high pressure guns now and more supplies now…. But I have never purchased any of them.  These might be good sources if you need a gun fast?  I have also found some random high pressure stuff at Home Depot.
  • You need to use plumbers tape on everything

Parts:

  1. Plumbers tape $1.87 LINK
  2. Parker S2107E-6-6NI 90° Boom Swivel 3/8″ M x F  LINK
  3. Black 3/8 6 foot hp hose for the inside of the 360 degree boom (KR)
  4. Brass Fittings Pipe Coupling 3/8 $1.39 LINK
    • Stainless steel class 1000 version $3.79 LINK
  5. 4 inch piece of stainless steel piping sch 80 316/316L NPT male (to prevent the boom from rubbing a hole in the hp hose) $3.94 LINK
  6. Brass elbow 90 degree fitting 3/8 fpt LINK $3.35
  7. Whip hose:  3/8 1 foot hp hose
  8. I started installing quick disconnects next.  (Helps in the winter when or if you shut down the wash.)
    • 3/8-Inch Stainless Steel Quick Connect Pressure Washer Adapter Set $12.99 LINK
  9. Blue 3/8 8 foot hp hose to the gun (KR)
  10. Fluid Controls 3/8 FxM Brass Swivel 3500PSI $18.99 LINK
  11. Giant Guns w/SS Discharge Fitting Weep $24.95 LINK
  12. Wand Pipes Threaded & Tapped 1/4” x 18” Stainless WTS418 $9.44 LINK
  13. 18″ D&H Insulated Lance WTL22003 $15.50 LINK
  14. Snap Clip for WTL22003 WTL22004 $4.35 LINK (Not required)
  15. Gun Guard – Black, Rubber GUG22046 $3.50 LINK (I was told I should use these…. I never did.  They look annoying to me.  :))
  16. Suttner Nozzle Protectors 1/4 F x 1/4 F SUTNP4F4F $4.99 LINK (I love these but the zinc fitting will rust…. It should be stainless.  But your crappy setup rust also.  LOL 🙂 )
  17. Spraying Systems 1/4 in. Male NPT WashJet Spray Tip, 2507 SN2507M4 $3.45 LINK

This was a variation on what was installed when I purchased the wash.  I believe the Suttner nozzle protector makes the gun setup look a lot more professional.   At a different wash I used a Spring flex wand…. Which I liked because the customers were more violent with equipment.  🙂  I did replace the nozzle with the Sutter…. Small rotating nozzles are super annoying.  You can also purchase a cheaper gun setup…. I have used cheaper gun setups.  My Dad had purchased and used some of the worse equipment I have seen…. It is not what you should do.  LOL 🙂

Also the GinSan Blue Nozzle Protector Fits 1/4 is the type of nozzle I hate LINK especially anything smaller.  They rotate in your hand.  The Sutter nozzle is not perfect because it is not stainless and will rust onto the stainless wand pipe.  Then you have to use a pipe wrench.  Also replacement parts would be nice because the outside black piece could be replaced more frequently…. Maybe if it was cheaper?

Also a note that all the fittings are 1/4″.  Usually I have found in all the used equipment I have seen operators use 1/8″.  I believe larger is easier to work with, makes larger parts, more throughput and probably better.

  • Spring Flex Wand with 1/8 Nozzle Protector $16.99 LINK


  • Stainless steel pressure chart I went by: LINK (Let me know if I was incorrect. Preciously I purchased from a catalog but could not find the email.)
  • An aside for Kleen-Rite: You should use a link shortener for emailing links. Your links are interesting and very long.  Also before anyone says anything…. I used part numbers from a 2005 catalog and they are still the same.  Just a hint and just saying.

How to reset your Hamilton Changer C2000 controller


This is for a Hamilton C2000 controller
Assuming you have an issue with your bill changer….

1)  You should find the error code.  This is a code coming from your C2000 controller not your bill acceptor.  (This  light is indicated with the blue arrow.)  The code has 2 flash patterns and a pause in between the flashes  (I included the error chart to help).

  • (In normal operation the light should be green.  Green is the only color the light can be.  🙂 )

2)  Next you fixed the code issue….  Add coins, fix something!  🙂

3)  Push the reset button if required.  The reset button is indicated by the red arrow.

Inflation is a little ridiculous….. I will try this at my business! LOL :)


This might explain why the traffic has reduced at the PO Box! LOL 🙂

So my PO Box started out at $62 a year…. Then $70 a year…. Then $76 a year…. Now it is $84 a year? So from 2015 – 2018 it has gone up $22? (This was just when I switched to the USPS website.)  This is an Alabama USPS PO Box yearly price.

My serious question is…. Why do so many USPS carriers drive through our hood now?  So they can burn more gas (for the environment)? I might support it then. 🙂 To many packages in March? I honestly do not understand? Today a USPS van delivered a 14″x4″x6″ package (estimated size)…. An hour later our random mail carrier came?  Sometimes someone will deliver mail or packages randomly in the morning then 6-8 hours later someone will deliver more mail?  Seems silly?  Sunday seems silly also…. But I do not judge.

I know someone that delivers for UPS and if his route has to much mail…. They just stuff the truck with more mail. In busy months like March…. JK December they do hire a helper but USPS I believe did not? USPS did delivered mail super late at night in December though…. I also did not feel sorry for the USPS drivers…. They get overtime and probably double their salary around December? I would deliver in my hood if I could never get fired…. I would like to add no transferring either. That is how they try and get rid of losers…. Not saying I would be a loser…. Or am I? LOL 🙂

How to troubleshoot not getting any water from your high pressure pump! Part 2

Here is PART 1 on troubleshooting a high pressure pump.  LINK

This problem I believe depended on the time a customer allowed the bay to unload the high pressure.  Which varies greatly and would make this problem almost seem random.  You would also need to pay close attention which I did not…. This would be no problem if you only have one pump or one bay.  🙂  (I checked this pump around 3-4 time…. Sad to say.  The problem is the pump actually works completely fine.  Like video below…. Pressure just seemed high.)


In retrospect after fixing the v-belt on the cat pump…. I remember previous issues I have had.  I had to reset my motor started for some reason?  Now I know why.

At the time I tested the bay and everything was fine…. I thought. I believe now I did not test the gun like the video. I do remember thinking it had high water pressure and I needed to turn it down though.

After I fixed the belt and I thought I was finished with my repair…. I tested the bay.  The bay then popped the breaker.

Which was a surprise…. Usually when repairing one problem it fixes the problem! 🙂 This meant there was obviously another issue.

So I reset the breaker and this time watched and payed attention to how the high purchase gun was working. (Like the video above.) After looking at the pressure problem again it seemed like it had to be the unloader.

I replaced the unloader and the unloader fixed the problem.

Tools used when repairing the high pressure pump yesterday.


When I was repairing the broken v belt from yesterday these were the tools I used.

I really like the Milwaukee 2457-20 M12 ratchet Greg told me about…. I thought it was completely worthless also but it is a great tool.  I really wanted a 1/2 air Aircat 805-HT-5 High Torque Ratchet…. with 130 ft lbs of torque!  But someone talked to out of it.  🙂  I really did not want to purchase a set of 3/8 sockets…. I ended up purchasing the Tekton 3/8″ shallow impact sockets 47915 which are pretty cheap in metric and even normal measurements.  LOL 🙂  I purchased metric for an American car I was working on?  Also I used a random Crescent wrench….  but my favorite adjustable wrench is probably my Klein Tools D50712 Adjustable Wrench with Extra Capacity 12-Inch (I believe)…. with the dipped handle.  It is just nice…. I should probably purchase smaller sizes?

Later I used my Tekton WRN53091 Ratcheting Combination Wrench Set which I really like the ratcheting aspect.

Original post:  LINK

How to troubleshoot not getting any water from your high pressure pump!

Today, I had a high pressure pump not delivering water! The official complaint was: “I am here with a Coleman rep and we can not figure out what is wrong with all the bays! All the bays do not have high pressure rinse.” I asked are you sure it is all the bays…. But what do you expect?  LOL 🙂 This Coleman rep should also quit…. He allegedly owns a self serve car wash also? I do not believe it. 🙂  He also asked me know to use a Dixmore remote control…. But it is actually not an official remote.  But it is actually worse I believe…. I wrote the directions on how to use the remote on the remote.  Maybe I am to harsh?  🙂

So obviously you can do your troubleshooting in whatever order you want. I try to do the easy stuff first.  Most of the time I like to go straight to the hardest…. But let’s be honest…. That is the dumbest method!

There are quick disconnects in the bays so by removing the gun I can test if there is a clog in the nozzle.
1) Check the nozzle / gun for clogs. Remember a very small amount of dirt or debris can cause the system to not work.


Check your water source to make should you or some random person did not turn it off. I have had this happen before…. By some random person that is…. But I might have done it also? The random person also broken my weep system at least twice. Almost like the random person could care less about my stuff? LOL 🙂
2) Check your water source.


To verify the flow I removed the high pressure hose from the Cat pump…. Then I used the motor starter to see if this fixed the problem.
3) Verify if you are getting high pressure out of the pump.


Verify if the water is getting to the pump.  (Water should come out of the hose when removed.)  I removed the water supply line form the Cat pump to verify this…. I was getting water.
4) Verify if the supply line water is getting to the high pressure pump.


Check to make sure the belt for the motor and high pressure pump is working correctly. This appeared to be my problem…. It actually was not though.  I had a different problem which caused this problem.  But this will help you troubleshoot most of your high pressure pump problems.
5) Verify that the belt for the motor and high pressure pump are at the correct tension and working correctly.


Also when installing a new belt…. I installed mine without removing anything.  Try putting the belt on the small pulley and then turning the belt onto the larger pulley.
6) Size matters….  Do not just slam it in there it will not work!  Be slow, use your hands and be gentle.  This might be something for a different post?  🙂


This would also cover troubleshooting pressure washers.

Tools I used for this repair:  LINK
Here is PART 2 on troubleshooting a high pressure pump. LINK

So I Wanted a Stripper…. Then I Got the Phone Call!


So I have liked strippers for the past 30 years.  My first stripper I purchased from Kmart (of all places) when they had employee appreciation day and I got 20% off (my first job…. I told them our Kmart store was going to close after WalMart opened btw…. It did.)  My first yellow stripper lasted the longest until the blade fell off somewhere.  My second red Neiko 01924A lasted almost 5 years.  My Neiko’s plastic red handle would keep falling off.  (I guess I could have epoxied it or duct taped it? or #$@% it…. This tool just got super annoying to use…. sorry for the language!  LOL 🙂  The handle is cheap and just not ergonomic. )  Today I got a tip from Greg about strippers…. About the Klein Tools 11061 stripper.  So I purchase the Klein as my replacement…. Maybe it will last 5-25 years?  🙂

BTW The Klein 11061 cost $22.05 and the Neiko 01924A cost $16.58…. So it is really not worth getting a cheaper version if you plan on using the tool.

This is a really great type to have if you ever have to strip lots of cables…. Alone with a good pair of wire cutters (The built in cutters on these strippers are annoying to use more then once and because this tool is really used for lots of cable cutting do not think about it.  🙂 )  Great stripper design though.

I do have different style wire strippers in my bag.  These are better for working on less wires.  These are Klein Tools 11055…. I also have a smaller style and a couple different brands actually.  I believe I have 2 of the Klein actually?  🙂

My Article in the Fall SSCWN Magazine

I always loved the old Self Serve Car Wash New Magazine run by JJJ / Jarret J. Jakubowski.  I remember waiting for the magazine to show up at my house.  I also remember asking my Dad why it did not show up on a regular basis.  🙂  Apparently he wanted good content in his magazine and it always appeared in a large newspaper print form of a magazine…. Very unique.

Well things change…. I also wrote an article in the Fall 2017 edition of the new SSCWN magazine.  LINK to Article